The Nakiri Knife: Your Complete Guide to the Japanese Vegetable Knife
A nakiri knife is a Japanese vegetable knife with a flat, rectangular blade. Unlike curved chef's knives that rock through ingredients, the nakiri's straight edge cuts cleanly from heel to tip in one downward motion. No partial cuts, no accordion vegetables still connected at the bottom.
The name comes from the Japanese "nakiri bōchō," meaning "knife for cutting greens." It's standard equipment in Japanese home kitchens and increasingly common with Western cooks who do a lot of vegetable prep.
What makes a nakiri different from other knives?
The nakiri looks nothing like a Western chef's knife. The blade is rectangular, almost cleaver-like, but thin and light.
The edge runs perfectly straight. No curve, no belly. When you chop, the entire blade hits the cutting board at once. This matters because curved blades often leave vegetables partially connected unless you complete a full rocking motion.
Nakiri blades run 165-180mm long and stand tall enough to clear your knuckles. The blade itself is thin, often under 2mm, which means less resistance when you're cutting through dense vegetables like butternut squash or cabbage.
Unlike the single-bevel usuba that professional Japanese chefs use, the nakiri has a symmetrical edge sharpened on both sides. Easier to control, works for left or right-handed users, and more forgiving if your technique isn't perfect.
The squared-off tip isn't meant for piercing or detail work. It just maximises blade length for chopping. Some people find it safer for rapid cutting since there's no sharp point to worry about.
What is a nakiri knife used for?
Vegetables. Pretty much all of them, pretty much any way you'd prepare them. The nakiri is the definitive Japanese vegetable knife because it does one job well rather than many jobs adequately. Dicing onions for a mirepoix, shredding cabbage for coleslaw, breaking down a butternut squash, julienning carrots for a stir-fry. This is what the blade was designed around.
Among Japanese chef knives, the nakiri stands apart as a pure specialist. Where a gyuto tries to cover everything, this Japanese vegetable knife is purpose-built for plant-based prep and nothing else. That narrow focus is the point. If you cook with a lot of vegetables (meal prep, plant-based diets, stir-fries, salads), the nakiri does the work faster and cleaner than a general-purpose knife.
Rapid chopping
Onions, carrots, celery, peppers. The nakiri moves through aromatics quickly once you get the rhythm. Straight up-and-down motion, no rocking required. It feels different from a chef's knife at first, then it clicks.
Thin, uniform slices
The thin blade and flat profile give you consistent slices for cucumber salads, courgette ribbons, or aubergine rounds. Each cut is clean from top to bottom. No tearing, no crushing. This is where the nakiri's design as a Japanese vegetable knife really shows: the flat edge and tall blade give you control that curved knives can't match on produce.
Dense vegetables
Butternut squash, sweet potatoes, celeriac. Vegetables that fight back against a curved blade respond well to the nakiri's straight-down cut. The thin blade wedges through with less force than thicker Western knives.
Herbs and leafy greens
The wide, flat blade works for chiffonade cuts on basil or shredding cabbage. You can also use it to scoop chopped ingredients and transfer them to the pan.
Can you use a nakiri knife to cut meat?
Technically, yes. You can use a nakiri knife to cut boneless chicken breasts, salmon fillets, or other soft proteins without bone. The sharp edge will get through them. But "can" and "should" are different questions.
The nakiri's flat edge and lack of belly work against you on meat. With proteins, you often want a slight rocking or drawing motion to slice cleanly through sinew and connective tissue. The nakiri doesn't allow for that. Its straight up-and-down chopping motion, perfect for vegetables, feels clumsy and imprecise on a chicken thigh.
If you're cooking meat regularly, a gyuto knife is what you want. It has the curve for rocking cuts, the tip for precision work, and enough blade weight to handle proteins properly. The nakiri stays in its lane as a vegetable specialist. And whatever you do, don't use a nakiri on bones or frozen foods—that's a fast route to a chipped edge.
How to use a nakiri knife
The nakiri requires different technique than Western chef's knives. If you're used to rocking a curved blade back and forth, the adjustment takes a few sessions. Then it becomes second nature and you'll wonder why you ever rocked through an onion.
The grip
Use a pinch grip. Place your thumb on one side of the blade just ahead of the handle, index finger on the other side. Your remaining fingers wrap around the handle. This gives you control over the blade itself, not just the handle. It feels strange for about ten minutes if you've always gripped the handle like a tennis racket, but the precision difference is immediate.
The push-cut technique
The nakiri's bread-and-butter move. Hold the blade level above the cutting board, then push it forward and down through the ingredient in one diagonal motion. The full length of the edge contacts the board at once. No partial cuts, no rocking. This is what you'll use for most everyday chopping: onions, carrots, courgettes, peppers.
The tap-chop technique
Straight up-and-down motion, lifting the blade a few centimetres and bringing it back down. Faster than push-cutting once you find the rhythm. The flat edge means every chop is complete from heel to tip. This works well for rapid prep: dicing aromatics, breaking down celery, cutting through spring onions.
The pull-cut
Angle the knife so only the front portion of the edge touches the board, ahead of the ingredient. Then draw the blade back toward you and down, letting it slice through with minimal pressure. This creates thinner, cleaner cuts than chopping. Ideal for cucumber rounds, radish slices, or anything where you want paper-thin results without crushing the cell walls.
Mill chopping for herbs and aromatics
Rest the tip of the blade on the board and use a gentle tapping motion with the heel, working across a pile of herbs, garlic, or ginger. The wide, flat blade keeps everything contained in one area. You can mince a handful of basil or parsley in seconds without the bruising that aggressive chopping causes.
The guide hand
Curl your fingertips under your knuckles to form a claw shape. Rest your knuckles against the flat of the blade as a guide. This protects your fingers and controls slice thickness. Move your knuckles back a few millimetres between each cut for even slices.
Let the edge do the work
A sharp nakiri needs almost no downward force. If you're pressing hard, the blade is dull or you're fighting the wrong technique. The thin edge and keen geometry should glide through vegetables. Pressing harder just increases the risk of the blade skipping sideways.
Why you should never rock a nakiri
A curved blade distributes rocking force along the edge gradually. A nakiri has no curve, so rocking concentrates all that pressure on one small section of a very thin edge. Do it enough and you'll chip the steel. If you catch yourself rocking out of habit, just stop and go back to push-cuts or tap-chops. Up-and-down or forward-and-down, never side-to-side.
Speed comes later
Start slowly. The rhythm feels unfamiliar at first, especially if you've spent years with a curved chef's knife. Once the motion becomes automatic (usually a week or two of regular use), you'll move through vegetables faster than you did before. The flat edge means fewer correction cuts and less wasted movement.
Nakiri vs usuba: what's the difference?
Both are Japanese vegetable knives. They look similar. But they're made for different users.
The usuba is a single-bevel knife for professional Japanese chefs doing decorative cuts and paper-thin slices. It takes real skill to use well. The asymmetrical edge wants to steer to one side, and the thin blade chips easily if you're careless.
The nakiri is the home cook's version. Double-bevel sharpening makes it forgiving. You won't match an usuba's decorative precision, but for everyday vegetable prep, the nakiri is more practical and easier to maintain.
Nakiri vs gyuto: do you need both?
A gyuto handles meat, fish, and vegetables. It's a generalist. A nakiri only does vegetables. It's a specialist.
If you're buying your first quality Japanese knife, the gyuto probably makes more sense. It covers more ground. But if vegetables make up a big part of your cooking, adding a nakiri pays off. Meal prep, plant-based dishes, lots of stir-fries and salads.
The straight edge and tall blade make vegetable work faster and more precise. People often end up reaching for the nakiri more than they expected. If you're building out a full set of Japanese chef knives, the nakiri and gyuto complement each other well. Add a petty knife for detail work and you've got most tasks covered.
What to look for in a nakiri
Quality varies. Here's what actually matters.
Steel type
The blade steel affects sharpness, edge retention, and maintenance.
- High-carbon stainless (like AUS-10) balances sharpness, durability, and corrosion resistance. Best choice for most home cooks.
- Carbon steel gets sharper and resharpens easily, but needs more care to prevent rust and discolouration.
- Standard stainless is low-maintenance but won't hold an edge as long.
Blade thickness
Thinner cuts with less resistance. Look for under 2mm at the spine. Thicker blades feel clunky on vegetables and need more force.
Handle style
Traditional Japanese "wa" handles are lightweight and comfortable for long prep sessions. Western handles offer a different grip. Neither is objectively better. If you already own Japanese knives, matching handle styles keeps your grip consistent across your collection.
Balance
Good nakiris feel balanced, not blade-heavy or handle-heavy. This matters when you're doing the same up-down motion dozens of times during prep.
Caring for your nakiri
Japanese knives reward good care. Neglect them and they rust, chip, or go dull. Look after them and they last years.
Cleaning
Hand wash right after use with warm water and mild soap. Dry completely before storing. Never put it in the dishwasher. The jostling damages the edge, and prolonged moisture causes corrosion.
Storage
Use a knife block, magnetic strip, or protective saya (wooden sheath). Don't toss it in a drawer where the edge knocks against other utensils.
How to sharpen a nakiri knife
A whetstone is the best way to maintain a Japanese knife. Use medium grit (around 1000) for regular sharpening and finer grit (3000+) for polishing. Keep the original edge angle, typically 15 degrees per side.
The nakiri's flat edge actually makes it one of the easier Japanese knives to sharpen. There's no curve to follow, so you maintain a consistent angle as you draw the full length of the blade across the stone. Hold the blade flat against the whetstone, raise the spine to your target angle, and use smooth, even strokes. Work one side, then the other, alternating until you've removed the burr.
If you're new to whetstone sharpening, our step-by-step whetstone guide walks through the full process.
Frequency depends on use. Daily cooking means sharpening every two to three months. Light use can go longer.
What to avoid
- Glass or ceramic cutting boards (use wood or plastic)
- Twisting the blade while cutting
- Bones, frozen food, or hard seeds
- Leaving the knife wet or food-stained
Best nakiri knife for vegetables
Not all nakiris are equal, and the differences show up quickly. A nakiri that goes dull after a week of chopping onions isn't saving you any time. Edge retention is the single biggest differentiator between a good nakiri and a bad one.
Look for high-carbon stainless steel in the HRC 58-60 range. That's hard enough to stay sharp through weeks of daily vegetable prep, but not so brittle that it chips the first time you hit a butternut squash. AUS-10 and VG-10 both work well here. Pure carbon steel gets sharper, but it rusts if you look at it wrong, and most home cooks don't want that maintenance burden on a knife they use every day.
Blade thickness should be under 2mm. The whole point of a nakiri is clean cuts with minimal force. A thick nakiri defeats its own purpose. Handle comfort matters too, since you're doing the same up-down motion over and over. Wood handles (ebony, sandalwood) stay comfortable longer than plastic. For most home cooks, a good nakiri in the £80-120 range will last years and outperform anything you'd find in a department store knife block.
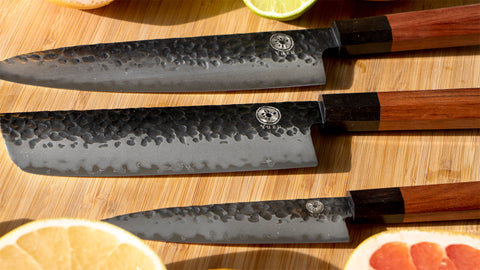
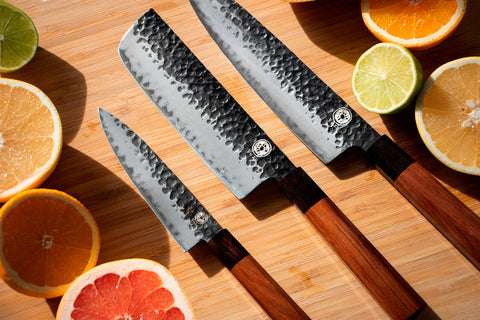
The Yuzu nakiri
Our nakiri knife is AUS-10 high-carbon steel. Hard enough to hold a sharp edge, tough enough to resist chipping, and more corrosion-resistant than pure carbon steel.
The san-mai construction sandwiches the AUS-10 core between layers of softer stainless steel for durability while keeping the cutting edge precise. The kurouchi (blacksmith's finish) helps food release from the blade and protects against rust. It also looks good, though that's secondary.
The wa handle is ebony and sandalwood. Balanced, comfortable through long prep sessions. At £95, it's the same steel and construction as knives costing twice as much from boutique brands.
The nakiri starter kit includes a whetstone and saya for £129 if you're starting from scratch.
Is a nakiri worth it?
Depends how much vegetable prep you do.
If vegetables are a regular part of your cooking, probably yes. The nakiri does one job and does it better than any general-purpose knife. Faster chopping, cleaner slices, less effort on dense produce.
It won't replace your chef's knife for everything else. But for plant-forward cooking, meal prep, or anyone who simply eats a lot of vegetables, it's a useful addition.